How to make USB device (Pen drive)bootable in windows 7.
Step 1. Download the tool
Download and install the Windows 7 USB/DVD Download Tool. Once installed, run the tool and in the first step select the location of the ISO file you have created earlier.
Step 2. Choose the type
Choose the USB drive.
Step 3. Attach USB Device
Select the USB drive, onto which you want the files to be copied.
Step 4. Wait for some time
Wait until the copying is finished. After copying was successful, you can exit the program and restart your computer. If the installation does not run automatically, you will have to set the booting priority to USB in BIOS.
Step 5.Setting up the booting priority
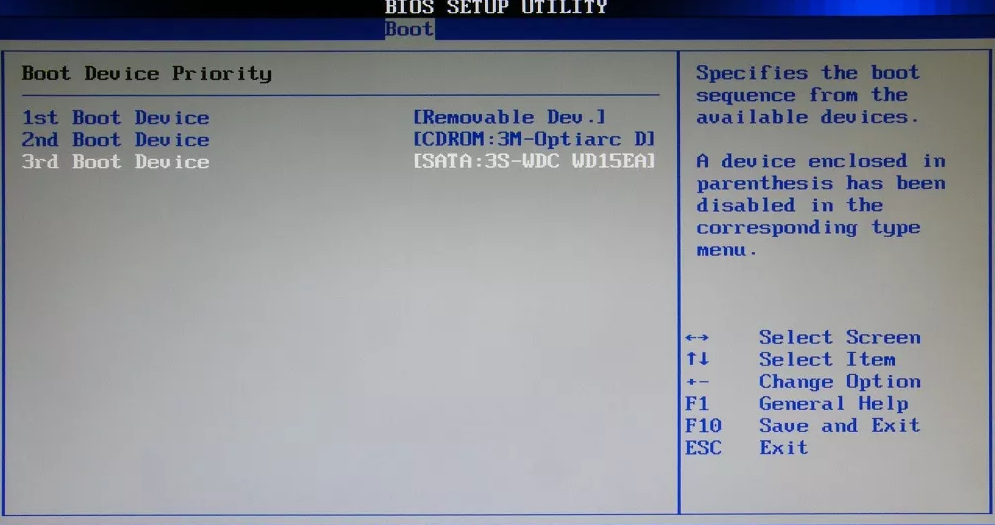
Take out your Windows 7 USB and insert it into the computer. If the installation does not run automatically, it is necessary to restart your computer and, in some cases, set up a booting priority in the BIOS. Go into BIOS by pressing the Del, F2 or F12 button immediately after restarting the computer. The BIOS version is based on your mother board .Some are different like below.
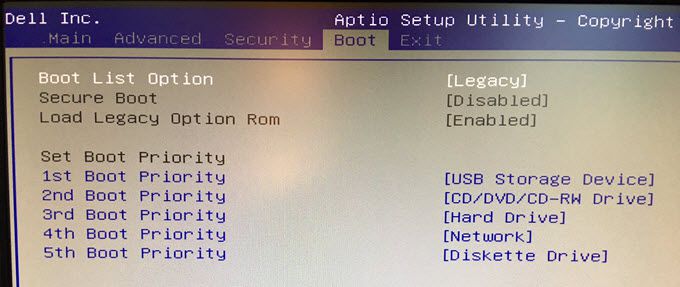
Navigate to boot and change your First Boot device to USB / Removable device. Change the booting priority and confirm the changes by choosing Save and Exit (F10).
How to make USB device (Pen drive)bootable in windows 8.
1. Mount Windows 8 image. If the Windows 8 installation image you have is an ISO file, you have to mount it on your computer. Just right-click on it and choose Mount. If the system image is on a CD/DVD, leave it as it is.
Tips: If there is no Mount option after right-click the ISO image, it means that the operating system of your computer does not have the capability to mount an ISO. Then, you have to use a third-party software to do it.
2. Format USB. Insert target USB flash drive into your computer and open Command Prompt. Then, input the following command orders one by one and each with Pressing Enter.
▪ Diskpart (open disk partition command tool)
▪ List disk (show all the disks connected to this machine)
▪ Select disk # (# is the USB disk number)
▪ Clean (clean up all files on the USB; if there are crucial data you’d like to keep, please move to another device before cleaning)
▪ Create partition primary (create a primary partition on the USB drive for saving Windows 8 system files)
▪ Select partition 1 (select the primary partition you just created; actually, there is only the primary partition on USB flash drive at this situation; this command is optional)
▪ Format fs=ntfs quick (quickly format the selected partition into NTFS file system; if you do not want it be a quick format, just omit “quick”)
▪ Active (active the selected partition; this command is optional)
▪ Exit (exit diskpart)
3. Make external USB bootable. Continue to key in the following commands:
▪ E:\boot bootsect /nt60 q:
“E” is Windows 8 disk drive letter, whether it is a mounted ISO file or CD/DVD; “q” is your external USB drive letter; “E:\boot bootsect /nt60 q:” means to change Windows 8 mount disk as the first boot device and make external USB bootable.
4. Copy Windows 8 ISO to USB. Use XCOPY to copy the Windows 8 system files to target USB
▪ E:\xcopy e:\*.* /s/h/f q:\
Way 2. Burn Windows 8 ISO to USB by Windows USB/DVD Download Tool
If you are not comfortable with command-line tools, this method is much better for you to put Windows 8 setup on USB.
Notes:
▪ The following screenshots are based on Windows 7 USB/DVD Download Tool, yet it is also applied to Windows 8 and Windows 8.1.
▪ The target USB will be erased, be sure to move out or back up important files.
▪ You must use an Administrator account on the computer upgraded.
▪ Windows USB/DVD Download Tool helps you to copy Windows ISO image to the USB. Yet, just copying and pasting the ISO file to USB is not workable. The Download Tool makes the ISO bootable without first running an existing system.
▪ The USB flash drive should have at least 4GB of memory.
Please read the instructions with warnings and notes slowly and carefully in case of any mistakes.
1. Download, install and run Usb download toolon your computer.
2. In the first screen of the Download Tool,
Step 1: Choose ISO file. The correct Windows file should have the extension name of “.iso”. If you currently have Windows 8 installation CD/DVD at hand instead of ISO file, you can make use of a free burning program to create ISO image.
Step 2: Choose media type. Please select the USB drive you would like to set up your Windows 8 on.
Step 3: Insert USB device. Insert the target USB into your computer and click Begin copying. This will erase your USB, please ensure that the crucial data is moved out.
Step 4: Creating bootable USB device. It will automatically carry out the task and just wait until it finishes.